Step By Step Hacking Tutorials
Learn Ethical Hacking / Facebook Hacking / Hacking guide / Pen Testings /
How to Hack / All Hacking Tutorials / Step By step Hacking,/ Free Ethical HackIng / Exploits/

Data Communications and Networking (McGraw-Hill Forouzan Networking)
For this we will use DNS redirect service from www.no-ip.com alternatively you can also use www.dyndns.com.


www.ReadNotify.com is professional e-mail tracking service. Service is paid and hence when you'll register they will offer you only 25 credits for demo. Service is damn good and complete information about your e-mail is traced out. It not only returns information about your mail got read or not but also brings information about IP address, time, location, web browser used and OS used to read sent email. It will also send you information about the mail has been forwarded or not or how many times it got read by recipient. Read Notify is most trusted email tracking service and hence used by many companies and even spammers.


Learn Ethical Hacking / Facebook Hacking / Hacking guide / Pen Testings /
How to Hack / All Hacking Tutorials / Step By step Hacking,/ Free Ethical HackIng / Exploits/
 |
| Step by step tutorials |
Dear visitor I have tried my best to place every article as easy as I can but anyhow if you think there is something on which an explanation is required or you felt something was more difficult to understand then please feel free to ask, your questions are most welcome and will surely be answered. While posting I may post randomly on any topic but at last you'll find them arranged in proper order and categories here. If you loved reading us then please don't forget to recommend us to your friends by your favorite social bookmarking sites and social networks, please don't use offensive words while commenting or asking questions. Thanks for visiting, enjoy learning.
Ethical Hacking | An Introduction
Whenever term hacker comes before many people consider it as a guy sitting inside a room or garage with a bottle or beer and a Laptop or Desktop doing wonders on click of buttons. But the reality check is hacking is not that easy as portrayed in movies and television and term hacker doesn't mean a computer criminal.
So here first of all we'll clear all our misconceptions related to words hackers and hacking.
So here first of all we'll clear all our misconceptions related to words hackers and hacking.
From Where This Word Came:
The word hacking has history in late 1960's, the time when computers were nothing but mighty pieces of machines and a computer just meant a machine that can compute. Electrical and Electronics geeks used to optimize circuits to make any system/circuit work faster, better and reliably. The job they used to do on circuits was known as hack. With time computer geeks also started finding way out to optimize their system to work better so in fact hacking was nothing but always a kind of reverse engineering. With time in professional world a word hacker got meaning, a person who is highly skilled in hardware, software and networking components. Then movies started portraying hackers do only dirty works and hence today the word hacker has a negative face according to people. No matter how the word met to a dreadful end a hacker always had all qualities that was first put forward in its definition may the be criminal or ethical. Criminal hackers are also known as Crackers.
Types Of Hackers:
White Hats: White hat hackers are good guys who use their hacking skills for defensive purposes. Organizations and industries pay them high salaries to protect their systems and networks from intrusion.
Black Hats: Black hats are actually bad guys in filed. Their main job is to breach security and make money. They make money by using their hacking skills for offensive purposes.
Grey Hats: Gray hats are hackers who work for offensive and defensive purposes depending on situations. They are hired by people to intrude and protect systems.
Hactivist: A hacktivist is kinda hacker who thinks hacking can bring out some social changes and hacks government and organizations to show his discomfort over some trivial issues.
Suicide Hackers: Suicide hackers are those who hack for some purpose and even don't bother to suffer long term jail due to their activities. They can be bad as well as good.
Script Kiddie: A script kiddie is a person who boasts breaking system using scripts and codes written by others though he hardly knows what the code does.
Phreak: It is a person who tries to intrude systems for fun or malicious personal activities. Mostly they are children of age 12-15 who don't even know wrong consequences of hacking.
Types Of Hacking:
Local Hacking: This type of hacking is done when a hacker has full access to the system to implant a virus, keylogger and RATs
Remote Hacking: Remote hacking is done on a remote system using Internet.
Social Engineering: Social Engineering is kinda interacting skill that a hacker uses to manipulate people giving out sensitive information. Its kinda trick done using good verbal, social skills and understanding.
Terminologies Used Under Hacking:
Threat: A threat is an environment or situation that could lead to a potential breach of security. Ethical hackers look for and prioritize threats when performing a security analysis.
An Exploit: An exploit is a piece of software that takes advantage of a bug, glitch, or vulnerability, leading to unauthorized access, privilege escalation, or denial of service on a computer system.
Vulnerability: A vulnerability is an existence of a software flaw, logic design, or implementation error that can lead to an unexpected and undesirable event executing bad or damaging instructions to the system. In easy word vulnerability is weakness in system.
Payload: Payload is agent that helps in taking advantage of vulnerability in remote hacking.
Attack: An attack occurs when a system is compromised based on a vulnerability.
Types Of Attack:
1.Operating System Attack
2.Application level Attack
3.Shrink Wrap Code Attack
4.Misconfiguration Attack
Operating system attack is attack done on specific type of OS. Such attack is done using flaws in programs and services shipped with OS. Application level attack is done over faulty coding practices done over software during its development. Shrink Wrap Code attack are attacks done over UN-refined scripts used for making task simpler. Last is misconfiguration attack, it is kinda attack which is done over mis-configured system or a system with default settings.
Work Of An Ethical Hacker:
Job of an ethical hacker is to use all his skills and tools used by malicious hackers to find vulnerabilities in system and then provide it security against those vulnerabilities.
Conclusion: At last what I want to tell, nothing happens in clicks of buttons. A hacker is highly skilled person in field of computing who usually have ample knowledge about software, hardware, OS, networking and programming. A hacker may it be criminal or ethical has immense patience, determination, organization, discipline and persistence. An attacker may spend months of time planning, analyzing and executing an attack. This shows his level of dedication to achieve whatever goal he/she has set. A person can never become a good hacker unless he have all above qualities.
Note: Now onwards we will cover hacking as our main stream topic on this blog. Real hacking is never done over lamers who hardly knows about security, it is done over a person who is highly skilled as you are. You can never learn hacking until you do some practical and gain knowledge about field so now onwards I urge you to perform practicals that will be now posted on this blog on your own system. Next no tutorial will be taken as a lamer so they will be in possible higher details, so this may happen that you may not understand something. Rather than keeping yourself mum I plea you to please ask whenever you encounter a problem or get bothered by topic. Whenever I 'll post on hacking I 'll try to keep a theoretical and one practical tutorial, you are requested to read both and grasp matter completely. Thanks for visiting and please tell are you clear with all points discussed or need some explanation on your difficulty.
Skills Required For A Hacker
Following are some must know things for a hacker or you can say requirements of hacker.
Operating System:
As a hacker you must have upper hand skills in Operating systems Windows, Linux and Unix. Once you master Linux and Unix you'll hardly face problem getting yourself on MAC. As we'll move further we will cover both of them in short and then slowly move our level to advanced.
Networking:
A hacker must have expertise in field of networking even if you don't have them you must be knowing about some basic terms used in networking. Please click on following links and try to grasp topics as thoroughly as you can.
The reality is that a hacker should know networking to best level. Just knowing above terms is not sufficient though you'll not encounter that much problem while learning. We still recommend you buying a book on networking that should cover networking to level of pin points. My personal favor is to book Data Communication And Networking by Behrouz Forouzan if you want to start. Click on following link to know more, read people's view or if you want to purchase.
Knowledge About Setting Up And Configuring Servers:
Yes that is necessary for a hacker so when we will move ahead with flow. We will cover configuring IIS 7, Apache, Vertrigo on Windows and Apache on Linux. Both HTTP and FTP servers will be covered.
Programming:
Absolutely no one can deny all best hackers in world have master hand in programming. Following are must know programming languages but you can even make things work even if you don't know them. In any case I would recommend you learn programming.
HTML, C, C++, Java, SQL, Python, Perl, PHP and Ruby.
At most basic level my advise will be you must know HTML, C, SQL, PHP and ruby.
Tools:
Backtrack is platform which is specially crafted and designed for penetration testing. Metasploit is framework that is used to create and experiment with exploits and payloads. Both are must for a hacker today. Alternative to Backtrack is Knoppix Security Edition and Mautrix, if you master Bactrack you'll easily master both of them. So I will not leave them apart from our list, we'll also cover them.
Steps Involved In Hacking
Steps Involved In Hacking
As mentioned earlier ethical hacker takes same steps as malicious hacker. Following are different steps that are performed during hacking.
1.Reconnaissance:
This step involves gathering potential information about target system. In fact hacker spends 90% of time for this phase only and next 10% time for rest of the steps.
2.Scanning:
During this phase network is scanned for vulnerability.
3.Gaining Access:
This is the step where real hacking takes place. Hacker takes advantage of vulnerability found in scanning phase and penetrates the victim system.
4.Maintaining Access:
After gaining access hacker makes provision to come back by planting root-kit and backdoor.
5.Covering Tracks:
In this phase hacker removes all traces of his/her presence in system by removing log files and event logs.
Basic Lab Setup For Hacker
In this tutorial we will discus how you can setup a lab for yourself to practice hacking on your system. At very basic level a hacker is in need of 2-3 systems with a Wired LAN or Wireless LAN. But if you are the one who has started just like me with just one laptop or computer then possibly there's no way you can match this setup. So following was my solution to start practicing with only one laptop or PC meeting above criteria of multiple computers connected in LAN. At most basic level following are your requirements.
Requirements:
A Computer:
First of all a computer which must have minimum following configuration.
A processor with 1.7GHz clock speed,
120GB + Hard disk
2GB RAM, Please note than your RAM must be above 1GB for practicing. If your RAM is less than 1GB or 1GB I 'll highly recommend you buy 512MB module extra or 1GB gigs for you.
A Virtual PC Emulator:
A virtual PC emulator is needed since I assumed you don't have multiple PC's to setup your lab, even if you have it I would prefer to advice you to use a Virtual PC Emulator. There are several options to pick from but our pick is “Oracle's Virtual Box”. Reason its open source means free, low on resources, supports all kind of network types, no problem to setup screen options, it automatically setups resolution once you install guest installation and have nearly all that features that a professional virtual PC emulator may have. Following is download link to virtual box latest version.
A professional choice is VM-Ware. You can purchase it from following link if you want to run it on Mac.
Though VM-Ware have several advantages over Virtual Box, virtual box is just good to go. Prefer it if you want to shed money.
An Online Synchronization Service:
If you think even that needs shedding money, then I want to assure there's again a free alternative available, its name is Drop Box. Go to www.dropbox.com and create your personal free account then download its setup file and install for synchronization.
A Static IP Address:
Now that will be problem to get a static IP address since a static IP Address may cost you nearly $100 I.e approximately Rs.5000. But don't worry about it we have a free alternative solution to counter problem of static IP. So when there'll be need I 'll clear how to tackle it else even if you have money to shed I will not recommend it.
A PC restore utility:
There are no free alternative to PC Restore Utilities so we will work out on evaluation version. Download Farconics Deep Freeze from following link
IP Address Hiding Utility:
Proxy Servers, Anonymizors and VPS are some IP address hiding options. We will discuss them when their need will come in to play.
High Speed Internet Connection:
Of course when you want to learn hacking you need a high speed Internet connection. Opt for a USB dongle by BSNL, TATA, Reliance as mobile broadband and BSNL land-line broadband is just much better option. If you don't have high speed connection and you work on slower connection like GPRS and dial-ups its hard to learn hacks done over Internet.
Procedure:
Before you proceed create a separate partition for installation of Virtual system, the partition must be at least 15GB in size. First of all download latest version of Oracle's Virtual Box and install it on your system. While installation it'll ask several times about installing various components just press OK for all of them because you'll need them all.
Watch following video tutorial on how to setup and install OS in Virtual System.
Once installation is done virtual box will come up with several pop ups when you'll be using it, please read each pop up because they are your tutorials to master “Virtual System Environment”. Please please please, don't skip any of those pop ups. When your installation will be over you'll see virtual system isn't really working in full screen. To tackle it run virtually installed system click on devices and “Install Guest Additions”. From next time it will run in full screen.
Setting up virtual system is done, now jump up to the next part start your virtual system open web browser of virtual system and download Drop-Box application and sign in to it. Now onwards whenever you'll download any software for hacking paste it into Drop Box default folder, it'll synchronize it with your online storage. After installing and signing up Drop Box download Deep Freeze don't install it now. Shut down your Virtual System and copy virtual hard disk as backup in another folder, start system and install Deep Freeze, before installing it read its online manual so that you should not get problem using it. Now when your Deep Freeze evaluation time expires just delete older hard disk and copy the backup and start over again. This will keep your evaluation copy last forever. If you haven't yet understood what we actually did with virtual box then I should clear we just setup a Virtual LAN for our practice using just a single computer. So you can't now boast you don't have a LAN to practice or a remote host to practice. You can run two virtual systems simultaneously if you have at least 2GB RAM. This not only solves our problem of private LAN to practice but it indirectly also offers you remote host to attack on. Our personal say is don't install virtual system on Windows XP or Vista, get Windows 7 or Server 2008.
Lab setup tutorial is over now go and setup your systm to get started. Please ask if you have got any problems related to setup, if everything is fine please don't forget to convey me. Thanks for reading keep visiting.
Using Dynamic IP as Static IP
Using DynAs we discussed in Basic Lab Setup For Hacker a hacker needs a static IP which is really very expensive for a normal person to have. Here we will discus how we can counter this problem. Please note that this solution is temporary and can never really take place of static IP but for now it will work.
For this we will use DNS redirect service from www.no-ip.com alternatively you can also use www.dyndns.com.

First of all register with www.no-ip.com by clicking on “No-IP Free” on home page. After you complete registration form hey will send you an confirmation e-mail, once confirmed, then you can log in to your account.

Now click on “Hosts/Redirect”, then type the host redirect name you want to which Dynamic DNS will redirect traffic after associating your IP. Let other options remain as it is if you don't know what they do.

Now create your host name. Now download “Download Client”. After installing DUC client type your e-mail address and password.

To check its working or not, type www.whatismyipaddress.com and check your IP address now ping the host name you created both will have same IP address.
Note: Most of you might be thinking what is use of this setup, you'll know its use when we will cover Trojans and Spywares. Also note that there are several free as well as paid Trojan Clients and Spywares. But free tools are prone to get detected by anti-virus program so better opt for paid ones.
Browse Anonymously
How can I browse anonymously or stay invisible online ? Is these among those questions which bother you for keeping your privacy online. Anonymizers, proxy servers, VPN and VPS are some options that can help you out. All above services are also offered as paid service but for here we will just have our look on free services.
Anonymizers(anonymity server):
Anonymizers are nothing but proxy servers which act as browsers inside browsers for surfing, their advantage is that they digest everything from the page you want to visit and hence can not only protect your privacy but can also prevent you from online malwares. I 'll not recommend you using some specific anonymizer since firewalls block them someday so better visithttp://www.proxy4free.com/ which updates list of anonymizers every hour so that you must get a working anonymity server. Alternatively you can use a TOR browser which really guarantees 100% anonymity. Download TOR fromhttp://www.torproject.org/.
Proxy Servers:
Proxy servers needs some manual settings from your internet configurations. Proxy server lift the limitation that anonymizers had of only being used in browser by making proxy IP available for every application that needs internet connection. Visit http://www.proxy-list.org/ for fresh list of proxies.

Alternatively you always have option of using a proxy generating software, following is brief list of proxy software with their download link have your pick.
Please don't ask which is best among them, its hard to say since working of proxy depends upon load on proxy server and it may vary with time. As my personal preference I use TOR and Ultra Surf when need proxy level anonymity. Please don't use transactional type browsing like e-mail, social networking or financial transactions over proxy servers, its not safe and still anyhow you want to use them better not use anything else than TOR.
Virtual Private Network:
VPN's are most trusted way of hiding online even secure than proxy servers and anonymity servers. Following is list of some software that provide free VPN services.
Ultra VPN is one of the most used and most trusted free VPN service of world, if you have problem trusting any other free VPN service better opt this.
The problem with which every VPN suffers it speed and bandwidth penalty. Also they need registration, only usaip can be used without registering by using username and password “demo”. The advantage they have above Anonymizers and proxy servers is that you don't have to bother about transactional browsing.
Virtual Private Server:
Virtual Private Servers are provided by companies in which each concept of running multiple virtual systems on same system is adapted. Though every PC may be residing on same server but for each individual his system acts as completely separate system. These are most reliable source to stay invisible online but are only offered as paid service.
I hope I have covered enough so that you can have your pick. Don't forget to tell us about your views and experience about using above tools. Please note that no matter which tool you use you will have to suffer speed penalty but sorry that is that cheap cost that you have to pay to browse anonymously and stay invisible online.
Reconnaissance
From Where Spammers Get You E-mail Ids
From Where Spammers Get You E-mail Ids
I know many of you always receive a special kinda e-mail with advertisements known as spam and you might be asking yourself from where a spammer might have got your e-mail ID. So here's the answer, following are some of the methods via which spammers gets your email ids.
Social Networking Sites:
If you are a social network animal then you might be knowing that sometimes we just add anyone as our friend without even knowing who the person is. Reason, most of us just wanna show off that we have a big friend list. But there are some people who are actually preparing this friend list to get your e-mail ids. People hardly care about privacy settings and leave their telephone numbers and e-mail ids open for spammers to have a look on. Now how they extract your email ids, all major e-mail clients like gmail and yahoo provide their users with API(Application Programming Interface) to pull e-mail ids of friend list available on social networking sites. Once all emails are pulled spammer download this email list as excel sheet and your e-mail ids are now ready to get spammed.
Online Applications:
If you have ever used facebook then you might be knowing whenever you access any facebook application it asks for access to all your private data, once you allow application access you give your e-mail to them, now they can use it for any purpose.
Online Games And Contests:
Many people have habit of playing games online and contests that appears free with prize. The fact is that many people might be playing those games and only one gets prize via lucky draw. How much legitimate that appears. These contests are nothing but sure shot fundas of companies to grab personal details of people visiting their sites. How this pays them, this list helps them prepare job lists for eligible and needy persons thus they don't pay a penny for job recruitment and also gets an employee ready to work on minimum payments. Next they can use this list to spam you with advertisement of their own products or they may even plan to sell their e-mail list to spammers for hefty amount.
Job/Technology/Career/Game Fairs:
You might have seen many people standing with some kinda forms in these kinda fairs to lure people with job opportunity, free stuff delivery or contest, which actually never is the case. Such fairs are good targets since by spending just few bucks a contact list with several thousand e-mail IDS and phone numbers is built that too without anyone suspecting.
Online Forums:
Hey don't worry I don't mean they sell e-mail ids or their database are hackable. While on forums many people unknowingly don't set privacy settings, also they post their e-mail ids as it is as comment or reply. These e-mail ids can be extracted using software used for extracting e-mail ids.
Web Mail Extractors:
Web Mail Extractors are software that search websites for patterns like this“@domain.com/@domain.net,/@domain.org etc”. Once found they extract complete email ids and save them in their database. One such tool is “Web e-mail Miner”. For today I would advise you to download it and try to find out how it works. Don't worry about how to use it, you just have to enter name of site and press enter and it'll pull email for you. Try a name of famous online forum, guaranteed to get a list with more than thousand e-mails.
Improperly Configured or Unprotected Servers:
Usually company uses two kinds of domains/servers one valid of all and one valid only for their employees and customers. Sometimes these two are interconnected with each other for employees to make changes to website that is public. The internal server for employees usually contains lot of information about their employees and job recruitment in excel sheets or PDF files which can be opened using browser. If they are not configured properly “Web Mail Extractors” can easily crawl in revealing thousands of quality e-mail ids.
Knowingly or unknowingly we might have made many of above mistakes which has lead our e-mail ids open to spammers. To next section to this we'll learn how we can keep ourselves safe from getting spammed. Feel free to comment about what you think about above information. Thanks for visiting, have a nice time and keep visiting.
Getting Whois/Domain Information
Getting Whois/Domain Information
As mentioned earlier reconnaissance/foot-printing is very first step in hacking. In involves gathering all potential information about target system that may help attacker plan and execute attack. It is not bluff that attacker spends 90% of his/her time for this phase only then uses his/her technical skills to find and exploit weakness in system according to his/her conclusion.
Even foot-printing/reconnaissance involves various things depending on type of victim you are planning to attack. In this post we'll discuss how you can extract information like domain name, domain name provider, owner of domain, his/her name, address telephone number etc..
Even foot-printing/reconnaissance involves various things depending on type of victim you are planning to attack. In this post we'll discuss how you can extract information like domain name, domain name provider, owner of domain, his/her name, address telephone number etc..
Whenever we purchase a domain it must be registered, this registry of domain names and their owner is known as domain information database and it is shared over internet for other users to get information about whether a domain is available for them or not. This information is also known as whois information of a domain. Here you will learn how to extract this information from database stored over network. Following is list of websites and tools that can help you extract this information.
Sam Spade (tool)
Smart Whois (tool)
You'll not require any skills to use these tools. They are very easy to operate as taking a lolly pop from a kid, what really difficult is to analyze the information you will be getting after using them. In Sam Spade type name of domain you want to get information for examplewww.google.com and press enter.

My next choice is Smart Whois which also works like Sam Spade but the fact is that usually all prefer Sam Spade, even I am not exception. When Sam Spade will fetch you results look on left side, there you'll find several options try them one by one and analyze the result it had fetched for you.
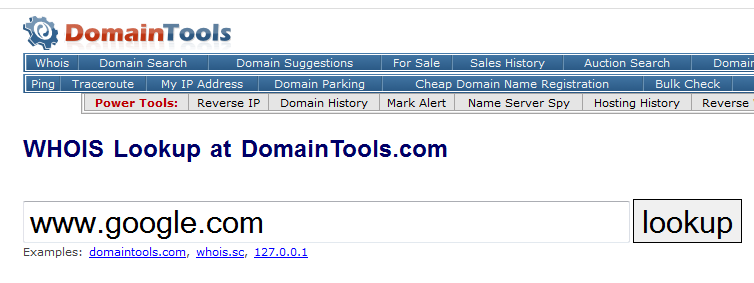
Next is using websites that can fetch you that result. As you can see I mentioned three online tools but before you read further I must tell you there are thousands of websites and tools that can fetch you whois information, the one that are mentioned here are my personal preferences. Type domain name in search box of http://robtex.com and press “Lucky” and inhttp://whois.domaintools.com type domain name in search box and press lookup.
Do it yourself and ask if you encounter any problem.
Advanced Google Hacking Operators
Advanced Google Hacking Operators
This is next part to Google Hacking, here we will discus some more search queries used for foot-printing. So following are your new queries, don't just read them practice them, you'll need a good practice of advanced operators just because they are more prone to give false positives.

Related:
This query will search web pages for the word specified after related. Please copy paste example in search engine and press enter.
Example: related:bill gates
define:
This query not only brings you definition and dictionary meaning of word but can also reveal you information about victims company. Try following query.
define:microsoft
define:your name
define:google
info:
This query is used to reveal history geography of word typed after it. Try following queries,
info:days of life of devil
info:microsoft
info:google
intext:
This will search every occurrence of word typed after it, it will not only search URL and title but also the text in body. Try this,
intext: google hacking
intext:days of life of devil
links:
This will search links to the URL that you will specify after it. Try following queries,
links:links:google.com
Now following are some other queries try them and see results yourself,
phonebook:bill gates
stocks:microsoft
stocks:linux
intitle:linux
inurl:linux
Please try them and let me know if you are facing any problem or any of those queries are not performing as you expected. Once you are good enough to use them we will discus how to use search queries to find files, folders, songs, movies, user-names and passwords
Prevention Against Google Hacking
Prevention Against Google Hacking
Previous to this we saw google hacking basics and some advanced google hacking operators. In this section we will see how to provide protection to your website from google hacking queries.
Website Cloaking:
It is a method where website is programmed to give different output to different IP address. For this a programmer first finds out IP with which search engine bot search for web pages then gives it different output when it comes to their website. Please note that not all pages are cloaked just the pages of importance are cloaked.
Google Hack Honeypot:
Google hack honeypot(GHH) is reaction developed to malicious kind of web traffic that hackers use to get information. It is open source and also supported by google itself.
Proper Configuration:
Proper configuration of website is necessary. Companies should not link their internal networks with company website. If it is necessary then make sure there should be proper configuration which should not allow external entity to enter internal networks of company.
Backup Storage:
Backup storage of website should not be kept on same server where the website is running. Use external space to store backup because backup pages can reveal more information than regular information available online.
Take Privacy Registration For Website Domain:
Taking privacy for domain will disallow attacker's to gain domain and name information about your site. Many web hosting services now offer you online privacy, this step can hurt attackers information gathering phase very badly.
Track Email Delivery
Reading this post for the only reason you read the title, track email delivery, isn't it. Whenever you send something important as mail you are always worried about whether it got read or not so here I 'll tell you about two services that will help you track your email messages.
Read Notify:
To check out how a receipt appears click here.
Get Notify:
www.GetNotify.com is free counter part to www.ReadNotify.com. It also tracks emails but details are not as detailed as Read Notify. I have heard from many people that its service is not good but believe me they are not as detailed as Read Notify but their service isn't that crap. I am using it since one year and I don't have any complaints just because it never gave me any chance, so if someone has defamed Get Notify in front of you, try it before you accept his/her words, I guarantee you'll find the defamer wrong.
As a personal judgment I don't deny Read Notify is better than Get Notify but its not that bad either and don't forget it's 100% free, you have to compromise a little on free stuff. As a final verdict I 'll say Read Notify isbest email tracking service whereas Get Notify is best free email tracking service.
How They Work:
Both use a same kind of strategy they ask you to embed email with a mini image provided by them while sending e-mail(Please note that this image is so small to get detected). When email is opened, this image sends all information about email to the person asked for receipt. No matter images are enabled or disabled this image will surely send information.
Don't bother about how you gonna use service because after registration both provide a cool video that demonstrates how to use their service and get most of it.
Thanks for visiting. Have a nice time and please don't forget to tell me about what you feel about above information about tracking email delivery.
Scanning
Angry IP Scanner
Angry IP Scanner
The next phase to reconnaissance is scanning. In this phase an attacker tries to gather information like IP address, operating system, open ports, running services etc. This information is further used by him to study kind of attack he must perform. Scanning can be classified into three major types,
- Port Scanning
- Network Scanning
- Vulnerability Scanning
During port scanning an attacker tries to find out number of ports open on target system and services running on them. The next stage is to find out number of active machines the target have and lastly vulnerability scanning in which attacker tries to get details about weaknesses present in target system.
There are several tools that can be used to perform port scanning among whichnmap is considered as best which I have already discussed long before on this blog. To read about it have a look on Network Scanner Nmap.
Here in this section we will see how to determine active systems. For our practical we will use Angry IP Scanner. Angry IP Scanner is a tool which pings several hosts in a row to find out which of them is currently alive. DownloadAngry IP Scanner from http://www.angryip.org/w/Download. Run it and specify number of IP address you want to scan.

Network Scanner Nmap
Nmap best known as hacker’s best friend may it be ethical or criminal is one of the best known network scanners available today. Today nearly each and every hacker uses nmap as network scanning tool and even pen-testing tools are bundled with Nmap as basic port scanning tool. Nmap can scan network, ports, services and also garb OS. This tutorial is written keeping this in mind that everyone should be able to grasp all commands and switches given in this tutorial in single reading. Do you think it’s impossible so why not give a try.
First we divide switches into four types,
1.Synchronous Scans
2.Ping Scans
3.Time Scans
4.Output Type
Synchronous Scan:All synchronous scans start with “-s”(without quotes), note that the ‘s’ denoting synchronous is not capital. Now a basic synchronous scan command is written as follows,
nmap -s[synchronous scan type] ip_address
----------------------------------------------
-sT Synchronous TCP scan
-sS Synchronous Stealth scan(This type of scan most of the time goes undetected by remote system)
-sF Synchronous FIN Scan(Sends FIN packets with RST flag)
-sX XMAS tree scan(A packet is known as XMAS when its all flag are set)
-sU UDP scan
-sN NULL Scan
-sP Ping Scan
-sO Protocol Scan
-sA ACK Scan
-sW Windows Scan
-sR Remote Procedure Call
-sL List DNS
-sI IDLE scan(A scan done with spoofed IP Address)
How to remember all synchronous scans: After reading above switch list you must have noted all types of scans appears to start with first letter capital of its own spelling placed next to “-s” except protocol scan which uses O. So practically you don’t need to remember anything other than which type of scan you want to perform then post fix “-s” with its capital letter. Isn’t that easy, now consider you want to scan aaa.bbb.ccc.ddd for its open ports and DNS entries. Note what you want,
-List DNS that means L
so this will be your command,
nmap aaa.bbb.ccc.ddd -sL
If you want to scan UDP protocol then type,
nmap aaa.bbb.ccc.ddd -sO UDP
Note: No two Synchronous Scans can be combined together.
nmap -sS -sU aaa.bbb.ccc.ddd is illegal.
Ping Scan: All Ping scans start with “-P”, note that P is capital and denotes ping. Now basic ping scan command is written as,
nmap -P[ping scan type] ip_address
-------------------------------------
-Pn No Ping
-PT TCP Ping
-PA ACK Ping
-PU UDP Ping
-PO Protocol Scan
-PS Synchronous Ping
-PI ICMP Ping Echo
-PB UDP ICMP timestamp
-PM ICMP Net Mask or Masked Scan
Now note the next option appearing after P is first letter capital of word’s own spelling except protocol ping and timestamp ping. As shown earlier everytime p from protocol will be replaced by O in scan type. To remember timestamp switch remember last letter p in timestamp appears like B.

Time Scans: Time switches are denoted by capital T.
-T Paranoid 300 seconds between scans
-T Sneaky 15 seconds between scans
-T Polite 4 seconds between scans
-T Normal Runs parallel scans
-T Aggressive 1.25 sec/probe
-T Insane 0.3 sec/probe
To remember time scans first we arrange times in descending order.
300 15 4 - 1.25 0.3
My friend is Paranoid who Sneaks around networks,
300 15
He appears Polite Normally but is Aggressive to the level of Insanity.
4 - 1.25 0.3
I think that will do. All time switches are appended at last of nmap command
nmap aaa.bbb.ccc -sS -T Polite
Output Type: It just formates output as you want. Always starts with “-o”
-oN Normal Output
-oX XML Output
-oG Grapple Output
-oA All Output
I don’t think now to explain how to remember them.
Other Important Switches:
--traceroute works similar as any other trace route program
-R Resolve DNS along with port scan
-v Scan in verbose mode
-O OS Scan
-O OS Scan
-----------------------------------------------------
So here’s an example to create scan:
1.Create a Stealth Synchronous scan with normal output with 15 seconds between each scan. Resolve DNS and use verbose mode?
Ans:
-Scan Type Synchronous means “-s”
-Subtype stealth “-sS”
-Use verbose “-sS -v”
-Resolve DNS “-sS -v -R”
-Normal Output “-sS -v -R -oN”
-15 seconds between scans “-sS -v -R -oN -T Sneaky”
So the answer is,
nmap aaa.bbb.ccc -sS -v -R -oN -T Sneaky
Following are for you try yourself,
2.Create a Ping protocol scan with 0.3 seconds scan difference between ports.
3.Create a Synchronous UDP scan with xml output use verbose mode.
------------------------------------------------------------------------------------
I hope we covered most of the switches in possible easy way. Feel free to comment if anyhow you felt the article wasn’t that easy as I expected or it was worth praise. Please feel free to share link to this article on your blog or facebook page if you think anyhow it became useful to you. Thank You for visiting and your comments are most welcome.

How To Use Super Scan
How To Use Super Scan
Super Scan be considered as one of the complete tool that can be used for scanning as well as getting domain information about target system along with windows enumeration. It can perform all stages of scanning and hence most of the time becomes best choice for every hacker on windows system. Here in this section we will see how to use Super Scan.
Type IP address of target you want to scan in Hostname/IP(1). If you want to add multiple IP/Hosts to scan press key near (4) and then specify another Host/IP in same field(1). To scan range of IP address type Start and End IP even this can be added to batch by pressing key near (2). If you want to add range of IP address then in notepad specify each IP/Host on new line and import it via (5).
You don't need to bother about Hosts And Services and Scan Options because they are good enough by default, change them when get habitual of using Super Scan. The nest option is tools, here Super Scan provides you with several options used for getting domain name information and grabbing banner(process to get version of application victim is running).
Hostname/IP: Resolves host name and IP address.
Ping: Check system for being live.
ICMP Traceroute: Traces path by using ICMP packets.
Zone Transfer: It is part of enumerating system, we will discus it when we will cover enumeration.(Click Here)
Bulk Resolve: Import list of IP address and Host-names in form of text file.
HTTP/HTTPS: These options are used to perform banner grabbing in above image you can see when I scanned local host it gave output as Version of Apache server I have installed this helps in finding exploits to run on victim PC.
All other remaining tools will give you domain name information.
Windows Enumeration allows you to find out how much vulnerable the victim is for gaining access but that we will cover later. For now if you have any problem using tool, please ask for help. Let me know if something was difficult to understand.
Banner Grabbing
Banner Grabbing
Banner Grabbing is process in which an attacker tries to find out application version installed in victims PC. In this following tutorial I 'll try to elaborate in short how we can grab banners. Note that errors are best friends as well as worst enemies of programmers as well as hackers since they reveal enough information that can be used against victim for exploitation. After we cover banner grabbing we will have our look on how we can prevent from banner being grabbed.


In next section we will discuss some more methods of grabbing banners and prevention against them. Please don't just read, try whatever you learned from this post. Don't forget to tell how was the post and is there anything you need more explanation
Banner Grabbing Using Telnet:
Telnet(previously known as Telephone Port) is one of the robust inbuilt tool that every OS has can be used to grab banner. In fact banner is grabbed using this technique is successful just because when we send wrong information to wrong port the victim returns with error message which also has banner information. Type the following in command prompt but before that be sure that telnet port number 23 is open by scanning via nmap.
C:\>telnet victim's_IP 80
HEAD/HTTP/1.1 (now press enter twice)
HTTP/1.1 200 OK
Date: Mon, 11 May 2010 22:10:40 EST
Server: Apache/2.6.01 (Unix) (Red Hat/Linux)
Last-Modified: Thu, 16 Apr 2009 11:20:14 PST
ETag: "1986-69b-123a4bc6"
Accept-Ranges: bytes
Content-Length: 1110
Connection: close
Content-Type: text/html
Date: Mon, 11 May 2010 22:10:40 EST
Server: Apache/2.6.01 (Unix) (Red Hat/Linux)
Last-Modified: Thu, 16 Apr 2009 11:20:14 PST
ETag: "1986-69b-123a4bc6"
Accept-Ranges: bytes
Content-Length: 1110
Connection: close
Content-Type: text/html
As you can see if the victim has not configured his/her system properly, we can get information like this which reveals our victim is using Apache server along with its version. Same also applies to any other server.
Banner Grabbing From Error Pages:
Every server is configured to return some specific type of error message for known types of problems this can be used to grab exact type of server the victim is running. Please have a look on following error page,

Now lets see what information it reveals,
Server: Apache 2.0.63
OS: Red Hat Enterprise Linux 5
SSL Tool: OpenSSL 0.9.8
Above page is displayed by Apache when you type URL that does not exist on victim's server.
If you find any button with input, leave input blank and press button it'll reveal you programming language used for web development. Following error page is got when I pressed submit button leaving input fields blank.

The above error page shows victim is using external web mail program “Squirrel Mail v1.4.6-1” and also used PHP as development language now as per our knowledge is concerned Squirrel Mail needs PHP v5 as a intelligent guess “Squirrel Mail + PHP v5” we can conclude the victim must be running MySQL as its database server. But its just a guess but while port scanning you have found 3036 port open that means we can be 100% sure yes its MySQL server.
In All:
Development Tools: HTML + PHP v5 + MySQL
Mail Agent: Squirrel Mail v1.4.6-1
Grabbing Banner From Page Extensions:
This only means just have a look on URL to find out what application our victim might be using. Here you might need some good knowledge of programming to identify application version. To gain application version you have to save page on your hard disk and view page source then use your experience in programming to deduce version of application, once application is known. I am really sorry this type of version detection is not possible to be taught, it needs programming experience so for this kinda detection you need to be good in web development.
.asp/.aspx: This sure-shot means victim is running Microsoft Active Server Pages technology.
.jsp: Java Based web technology. Most of the time database used is MySQL with JSP, this can be used as guess
.PHP: PHP + HTML
.cfm: Macromedia Cold Fusion
.asmx .Net/J2EE
.jws Java web services
.wsdl Web Service Definition Language (WSDL)
Note that extension may appear anywhere in URL so you must have keen look on it, next when extension doesn't seem familiar, Google with extension and you will surely get what kinda web development tools the victim has used.
Banner Grabbing Using Net Craft:
Net Craft is anti-phishing toolbar which also allows OS detection and banner grabbing. Browse to www.netcraft.com and type name of website you want information after “What's that site running”.
Some More Methods To Grab Banners
Some More Methods To Grab Banners
I hope you enjoyed reading last post on banner grabbing. Here in this post we will discus some tools that can be used to grab banners and we will also have our look on some of the tools that can be used for preventing our banners from getting grabbed. Following are some tools that helps in banner grabbing.
NetCat:
Net-Cat is TCP/IP debugging tool that can be used for banner grabbing. Download Netcat from its official site, its free. Have a look on its documentation about how to use it. Following command works same as telnet for netcat and helps grabbing banner.
C:\netcat\>nc ip_address 80
(Press enter twice and if it doesn't work then type following)
(HEAD /HTTP/1.0 and press enter twice)
Httprint:
Httprint is web server finger printing tool. It uses server signature to identify version of web application running on server. Download it from its official site again its free. I don't think there is need to explain how it works since their own help documentation is very small and easy to understand. Give it a try if you still don't understand how to use it ask me. I'll include a new post on it.
Miart HTTP Header:
Miart HTTP Header tool identifies banner information from HTTP Header and response type. Using it doesn't require any skill just enter URL in input box and press enter.
Prevention Against Banner Grabbing:
Preventing Apache Server And Its Derivative:
We can't say that there is some tool or specific method available via which we can stop banner of Apache from getting grabbed but if you'll have a look on its documentation, you'll find its not even difficult either. Actually full information about Apache and its derivative related problems and their solutions is included in their documentation and they differ for each version. Since they differ for each version I 'll recommend read its documentation to stop Apache giving out valuable information.
Preventing IIS Server:
IIS shares some advantages over Apache since various tools are available that help IIS server to defend itself against banner grabbing.
IIS Lockdown:
Its works by turning off unnecessary features thus providing multiple layer protection. Download it from www.microsoft.com.
Server Mask:
Server Mask removes every detail from website about it is using IIS server including removing all finger printing traces. It removes HTTP headers and also encrypts signatures thus providing protection against signature based banner grabbing.
Page Xchanger:
It is content negotiation tool. It cleans all URLs from extensions and hence make them appear more clear and navigable. It negotiates with every file and extension making site more secure since your site will show nothing about files, extensions and default error messages.
Fingerprinting OS
ingerprinting is a process in scanning phase in which an attacker tries to identify Operating System(OS) of target system. Fingerprinting can be classified into two types
-Active Stack Fingerprinting
-Passive Stack Fingerprinting
Active Stack Fingerprinting involves sending data to the target system and then see how it responds. Based on the fact that each system will respond differently, the response is compared with database and the OS is identified. It is commonly used method though there are high chances of getting detected. It can be performed by following ways.
Using Nmap: Nmap is a port scanning tool that can be used for active stack OS fingerprinting.
Syntax: nmap -O IP_address
Example: nmap -U 127.0.0.1
Using Xprobe: It is UNIX only active stack fingerprinting tool. Also runs on Linux, it can not only detect OS but also devices and their version numbers.
Syntax: xprobe2 -v IP_address
Example: xprobe -v 127.0.0.1
Passive Stack Fingerprinting involves examining traffic on network to determine the operating system. There is no guarantee that the fingerprint will be accurate but usually they are accurate. It generally means sniffing traffic rather than making actual contact and thus this method is stealthier and usually goes undetected. Passive stack fingerprinting can be performed in following ways.
Using p0f: It is passive fingerprinting tool. Both windows and Linux versions are available.
For Windows:
Open command prompt and type
C:\>ipconfig
it will list all Ethernet card available in your system, note the number of Ethernet on which your connection is running, in my case it is two. Now type “p0f -i card_number”

C:\p0f>p0f -i 2
Now try to connect to the system you want to fingerprint leaving command prompt open and p0f will detect OS.
For Linux:
In Linux you will need to install it first. If you are using Red Hat Linux and downloaded a rpm package then browse to the folder where you downloaded rpm package and run following command.
#rpm -i package_name
else if you have configured yum for download from repository type following commands.
# yum clean all
#yum list
#yum install p0f
If you are using Debian based or Gentoo based Linux and downloaded deb package then browse to the folder and type following commands,
#dpkg -i package_name
else if you want to install from repository then use following commands
#apt-get update
#apt-get install p0f
if you are using super user then don't forget to prefix “sudo” before type “ap-get” command.
Now open command prompt and type following commands,
#p0f -i eth0 -vt
where “i” means interface “eth0” is your communicating card “v” means show results in verbose mode and “t” means add timestamps to output. Now try to connect to remote system and fingerprint its OS.
Using NetCraft:
Go to the site of NetCraft and type IP address of target you want to fingerprint in “What's that site is running”. It'll give you its OS.
I hope that was quite easy, if you have any problems using any of the above tools then please don't hesitate to ask. I am here to help, thanks for reading and keep visiting.
Nessus On Windows
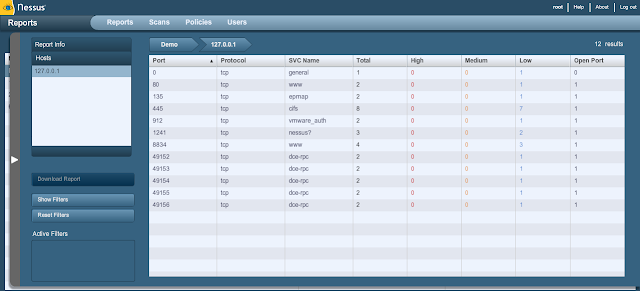
Nessus is one of the well known and most used vulnerability scanner program. Nessus was built for UNIX platform but now also supports Windows platform. Nessus runs as client server program and available as free and professional version. Download and register your e-mail with them and they will send you information about how to register and use it. Once installation is done you will have two icons one with name Nessus Server another withNessus Client first of all open Nessus Server and add users in it. Then open Nessus Clientand log in, after log in you will see interface as follows,
 |
| Please Open Images In New Tab |
First of all you will have to define some scan policy to scan target system. For that click on “Policies” then “Add Policy”. Its not difficult to understand how to define general section in policy but if you don't know much about different OS and networking I would better suggest let other options to their defaults.

Next step is to add scan, click on “Scan” and then “Add Scan”, type IP address you want to scan else you can also insert a text file with IP addresses of targets but for now just scan your own computer. Once you press “Launch” button your scan will begin. After scan is complete have your look on vulnerabilities found in target system.


For now don't bother about how to exploit vulnerabilities for hacking purpose that we will cover in “Enumeration” and “Gaining Access/System Hacking” phase. As an honest advice I would recommend you not to limit your self to this tutorial and find more tutorials onwww.YouTube.com . Thanks for reading and keep visiting.
Nessus On Linux
Nessus On Linux
In last tutorial we saw how to use nessus on Windows. But as told earlier nessus is multi-platform vulnerability scanning/assessment tool. In this section we will cover how we can usenessus on Linux platform. The installation process in Linux is not as straight forward as in Windows. So lets cover it first.
Since Nessus is supported by number of Linux distros we will list some most commonly used Linux distros to demonstrate installation process. Download nessus for your respective Linux Distro.
For Red Hat, Fedora, Suse Slackware:
#rvm -ivh <nessus_package_name>
For Debain, Gentoo, Ubuntu and its varients:
#dpkg -i <nessus_package_name>
Next step will be adding users since nessus runs as client-server even on Linux box, to add user type following command without any option.
# /opt/nessus/sbin/nessus-adduser
After typing above command it will ask you about details of user you want to add. Provide details and password. Next type the command as it is, sent for nessus registration by Tenable to your inbox. To start nessus server type,
# /etc/init.d/nessusd start
Once your nessus server starts connect to it via browser typing following command,
If you are connecting nessus for first time your browser will surely give error as faulty SSL connection select “continue anyway” or “add to exception”. Whichever appears on your browser screen. Rest you can continue as you did in Windows.
Enumeration
Enumeration | Basic Terminologies
Enumeration | Basic Terminologies
What is Enumeration ?
It is process of identifying potential user account that can be used for hacking target system. It is not compulsory that you must get administrative account because in most of the cases privileges of a normal account can be raised to make it super user thus granting him administrative privileges therefore enumeration phase is also known as escalating privilege phase. It may also include identification of devices and shared files and folders.
NetBIOS:
Better known as Network Basic Input Output System it provides services to OSI model(specially session layer) allowing several computers to communicate in Local Area Network (LAN). Main services of NetBIOS includes registering a group name from computer connected in LAN and making them communicate with other computers in LAN and share devices.
Network Shares Or Just Shares:
It means any device or file that is connected in network for sharing. It may include file, folders, hard disks, printers etc. Shares play important role in remote system hacking, so information about shares can help you escalate privileges.
SNMP:
Better known as Simple Network Management Protocol used for managing different devices on network. It may include hubs, switches, routers, printers, hard disks, computers, servers etc.
SMB:
Better known as Server Message Block is Microsoft's protocol defined for sharing file and printing services. Though protocol is old it is still used in most of the systems.
Null Session:
It is process in which a person can log into computer without user-name and password. Though this situation is very rare today we will just have our look on it. NetBIOS null session is vulnerability found in Common Internet File System(CIFS) or SMB due to which a hacker can access computer or device without account and password. Once Null session is got we can find users, devices and policies defined for network.
Dear visitor if you have not yet created your lab setup then please set it up now. To know more about lab setup read Basic Lab Setup For Hacker. Because now onwards the tutorials that we will cover will need more than one PC. I know many of you might not be having multiple PC's for practice hence I have specially covered how to setup your Lab with single PC using VirtualBox. I urge you if you are serious about learning hacking in legal way then install at least two Windows-XP in it and two different Linux distro better if one of them is mini Linux distro. Better setup your lab in requested way so that we can cover enumeration easily. Thanks for reading, please don't forget to tell me about your difficulties be sure I 'll answer them, keep visiting.
NetBIOS Enumeration And Null Session
NetBIOS Enumeration And Null Session
Net BIOS null Sessions occurs when you connect any remote system without user-name and password. It is usually found in systems with Common Internet File System (CIFS) orServer Message Block (SMB) depending on operating system. Once attacker is in with null session he/she can explore information about groups, shares, permissions, policies and even password hashes.
Null session attack uses vulnerability in SMB protocol for creating connection because it uses SMB uses trust for any kind of relationship between devices available in network.
Null session attack uses vulnerability in SMB protocol for creating connection because it uses SMB uses trust for any kind of relationship between devices available in network.
By default null sessions are enabled in Windows 2000 and Windows NT. Actually it is also enabled by default in Windows XP and Windows 2003 Server but they don't allow enumeration of user accounts. Any of the following port must be open to perform NetBIOS enumeration and null session attacks because they represent SMB and NetBIOS is supported by network.
Port 135 - Remote Procedure Call (RPC)
Port 137 - NetBIOS Name Service
Port 138 - NetBIOS Datagram Service
Port 139 - NetBIOS Session Service
Please note that all above services may use any of the TCP or UDP protocol.
The method to connect to remote system via null session requires you to connect to any device or share. By default in all windows systems Inter Process Communication (IPC$) runs as hidden share($ denotes share on remote system). We can say that IPC is null session share.
Now to check whether the system is vulnerable to null session or not type following commands.
C:\>net use \\IP_Address\IPC$
For example
C:\>net use \\192.168.56.1\IPC$
Next type
C:\>net use \\IP_Address\IPC “”/u:“”
where “”/u:“” denotes you want to connect without user-name and password. Now explore further information.
C:\>net view \\IP_Address
will show you list of shares, computers, devices, etc.

So here we complete how we can manually perform NetBIOS Enumeration and Null Session attack. In further posts we will cover some tools that are used for the above purpose and then available countermeasures. Till then practice above method of enumerating NetBIOS and tell me if you have any difficulty. You can try your own IP address(127.0.0.1) to enumerate if you want. Please ask if you have any problem using above commands and please practice hacking is practical thing you can never learn without practicing.
NetBIOS Enumeration Tools
In our last section we covered how to enumerate NetBIOS manually. Now we will have our look on tools that can be used for NetBIOS Enumeration . There are several Graphical User Interface (GUI) tools as well as Command Line Interface (CLI) tools available, here I will list only some of them and tell you about my personal preferences.
GUI Tools:
SuperScan:
You might be knowing we have already covered superscan before leaving enumeration part for this post. Now since we covered basics of enumeration I hope you'll not encounter problem using “Windows Enumeration” option in superscan.
MAC Address: Media Access Control (MAC) is unique address given to Network Interface Card(NIC)
RPC Endpoint Dump: Remote Procedure Call (RPC) is a service that runs on a system and allows remote task execution. Every RPC service uses TCP/UDP protocol to communicate with clients. There might be case that an RPC is allocated port number dynamically with or without static IP address. Here RPC Endpoint service comes to play, it tells procedure about the port number RPC is using.
I hope we have already covered all other terminologies related to enumeration.
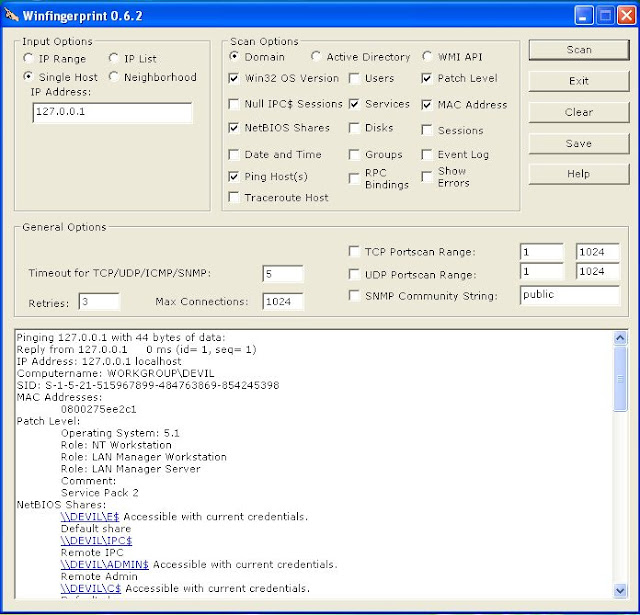
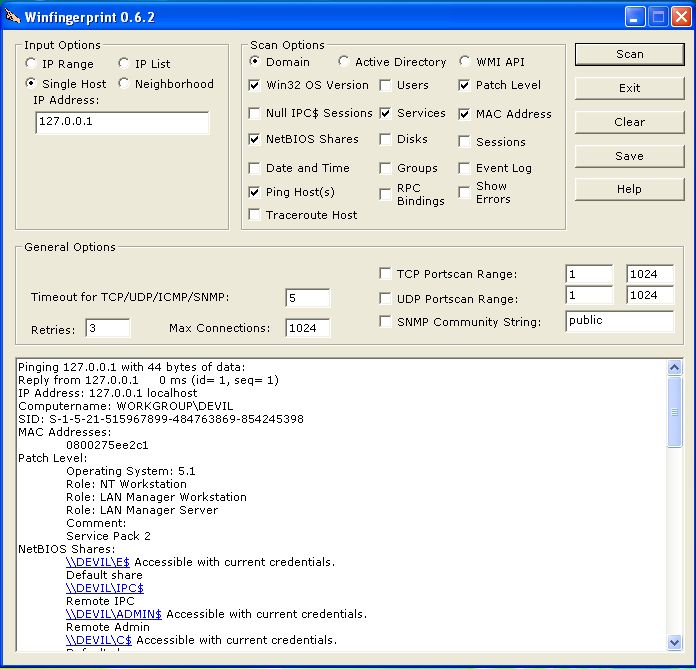
WinfingerPrint:
WinfingerPrint is tool of my choice for enumeration. It have nearly everything for enumerating a windows system and it also supports batch processing.
CLI Tools:
Please note that each command line tool provides its own switches for operation. Please have a look on their help pages for information on how they work. There is no unneccessary details available on help pages than swtiches and their use. They hardly make 15-20 lines, so please go through them to grasp material throughly.
THC-Amap:
It is next generation scanning and enumeration tool. It performs fast and reliable application protocol and port detection. Banner grabbing via amap is almost impossible to detect.
NBTScan:
As a command line tool NBTScan is my choice. It performs full test and creates HTML file as an output unlike other command line tools.
Other Tools For NetBIOS Enumeration
1.Hyena
2.Dumpsec
4.NBTEnum
Here we complete our NetBIOS enumeration, in further post we will discuss how to preventNetBIOS enumeration and then pick up topic SNMP enumeration. Till then don't forget to tell how was the post and please feel free to ask if you have any difficulties
Restrict Anonymous On NetBIOS
In previous posts we saw how we can enumerate NetBIOS manually then by using tools. Here we will have our look on how we can counter NetBIOS Enumeration and null session attacks on system. Null session attacks can be avoided by restricting anonymousconnections over NetBIOS. It can be done in following manner.
Press “Win+R”, a “Run Window” will come up, type “regedit” in it and open registry editor, alternatively you can type “regedit” on command prompt and access registry editor.
For Windows XP/2000 create following registry key:
HKLM/System/CurrentControlSet/Control/LSA/RestrictAnonymous=2
Now reboot your system.
For Windows XP Professional and Windows 2003:
HKLM/System/CurrentControlSet/Control/LSA/RestrictAnonymous=1
HKLM/System/CurrentControlSet/Control/LSA/RestrictAnonymousSAM=1
Now reboot your system.
For Windows NT 4.0 or further:
HKLM/System/CurrentControlSet/Control/LSA/RestrictAnonymous=1
Now reboot system.
Further remove hidden share IPC$, stop SMB services, to perform these tasks open command prompt and type,
C:\>net share IPC$/delete
C:\>net stop SMB
Now configure your firewall to disallow services asking for connection over NetBIOS by blocking ports 135, 137, 138, 139
SNMP Enumeration
SNMP Enumeration
I know SNMP enumeration is not really a hot topic as per today but still I think we must cover it for educational purpose. So before we proceed lets have our look on some basic terminologies related to SNMP.
What is SNMP?: Simple Network Management Protocol i.e SNMP is an application layer protocol used to manage TCP/IP based networks.
SNMP Agent: A device that can communicate with SNMP protocol.
SNMP Manager: It is an entity which sends requests via SMNP to its SNMP agents.
MIB: Management Information Base (MIB) provides a standard representation of SNMP agents available information and where it is stored.
Traps: Traps let the SNMP manager know about activities at SNMP agent. Activity might be reboot, device failure or any other suspicious activity.
SNMP requests/response are sent over UDP port number 161 and notifications are sent over port number 162.
What is SNMP Enumeration?: It is process of using SNMP to enumerate user accounts and devices on a target system. SNMP has two passwords to access and configure the SNMP agent from the management station. The first is called a read community string. This password lets you view the configuration of the device or system. The second is called the read/write community string, its for changing or editing the configuration on the device.
By default read community string is public and read/write community string is private. If these passwords are not changed they can be used by an attacker to enumerate SNMP as SNMP Manager. If the default password is not as above other default passwords can be found onwww.defaultpassword.com.
SNMP Enumeration Tools:
SNMP Util:
SNMPUtil is a command line tool which gathers Windows user accounts information via SNMP in Windows system. Information such as routing tables, ARP tables, IP Addresses, MAC Addresses, TCP/UDP open ports, user accounts and shares can be obtained using this tool.
Syntax:
C:\>snmputil {get|walk|getnext} {machine name} {Object Identifier}
get: This command gets the value of the requested object identifier.
getnext: This command gets the value of the next object that follows the specified object identifier.
walk: You use this command is used to step through (walk) the Management Information Base (MIB) branch that is specified by the object identifier.
Object Identifier: It specifies branch of MIB as defined in SNMP protocol. They are long, clumsy number which are really very difficult to remember. They all have their string equivalent but even they are hard to remember. Following is list of sting values,
Aren’t they hard to remember therefore I would not recommend this tool to anyone because remembering all those stuff is damn difficult. We have an excellent graphical tool instead of this tool I’ll better advise you to opt it.
Example:
C:\>snmputil.exe walk 192.22.0.24 .server.svSvcTable.svSvcEntry.svSvcName
This will list services.
IP Network Browser:
IP Network Browser is tool from Solar Winds Engineers Tool Set. It is graphical tool and can be easily used for SNMP enumeration.
 |
| Solar Winds Engineers Toolset |
 |
| IP Network Browser |
I think there is no need to explain working of IP Network Browser because it is damn easy to use.
In upcoming post we will cover defenses against SMNP enumeration. Till then don’t forget to let us know
Countermeasures Against SNMP Enumeration
In last section we saw how we can enumerate SNMP. Since SNMP can reveal plenty of information that can be used for hacking, it is quite necessary to prevent SNMP enumeration. In this post we will learn how we can create a strong defense against SNMP enumeration.
The best way to avoid SNMP enumeration is to remove SNMP agent from target system or turn off the SNMP service. If that is not possible then follow the following steps.
Enable the option in Group Policy Security option called Additional restrictions for anonymous connections. Also restrict access to null session pipes, null session shares and IPSec filtering.Additionally block access to TCP/UDP ports 161.
DNS Zone Transfer
In this post we will learn about DNS zone transfer in windows 2000 server. Before we continue to zone transfer, lets clear some of our doubts about zone transfer. In windows 2000 server clients use service records known as (SRV) to locate domain name services. The service records may include services like Active Directory*. This means every windows 2000 domain must have a DNS server for its network to operate.
So in all a windows based domain has two DNS server, the one which keeps information is known as primary DNS and the one who updates its information from it is known as secondary DNS.
*Active Directory: Active Directory is a scalable directory service that stores information about networking components, and makes this information easy for administrators and users to find and utilize. A directory is a listing of objects that uses a hierarchical structure to store information about objects such as users, groups, computers, and applications. This structure is often referred to as a tree, as it starts with a root and develops from there. Active Directory acts as the central authority for security, and it brings together various systems as well as management tasks.
Now question arises why 2 DNS?
So here’s the answer, windows 2000 is very much integrated with DNS (Domain Name System) and Active Directory heavily relies on DNS for finding objects in directory. Since DNS is used for providing name resolution to IP addresses windows 2000 domains has to be kept compatible with them.
Windows server manages a Dynamic DNS specially for providing services via Active Directory, this is done because services can manage them-self if they operate dynamically whereas a static DNS has to be managed and monitored manually. While static DNS will work, Dynamic DNS should be used to maximize the benefits of Active Directory. Data is replicated to each DNS server when Active Directory’s replication is used. Redundancy and fault tolerance can also be provided when other domain controllers are configured as DNS servers and make changes to the DNS information.
Now what is zone transfer?Zone transfer is a method via which a secondary DNS server tries to update its information from primary DNS. An attacker can fake out its computer as secondary DNS and can retrieve information from primary DNS. Even a simple nslookup command can reveal lot of important network information.
How to perform zone transfer manually?:
Open command and type following commands one by one,
c:\>nslookup
>set all
>domain_name
>ls -a domain_name
In above image you can see I tried a zone transfer, the output shows that the remote server has refused DNS zone transfer. Output will be different when you’ll try it on a server that supports zone transfer.
Here I am listing out several tools that can be used for zone transfer but my choice isSuperScan.
Command Line Tools:
User2SID
ENUM
SID2User
UserInfo
Graphical User Interface:
GetAcc
SMBF
SuperScan
Counter Measures Against DNS Zone Transfer:
Configure the server to respond only to authorized IP address for zone transfer.
Add IP address that will be allowed for zone transfer.
LDAP Enumeration
LDAP Enumeration
The Lightweight Directory Access Protocol(LDAP) is used to access directory listings within an active directory or from other services. A directory is compiled in hierarchical or logical form. It is suitable to attach with the Domain Name System(DNS) to allow quick lookup and fast resolution of queries. It generally runs on the port 389 and other similar
protocols.
protocols.
Sometimes, it is possible to query LADP service anonymously. The query can reveal information like valid usernames that can be further used for performing attacks.
Both command line and graphical tools are available for enumerating LADP.
LdapMiner:
It is command line tool that collects information from different LADP servers by identifying its type of server and then fetching specific information.
Syntax: ldapminer.exe -h host_ip options
-p [port]: default is 389
-B [bind]: default user null
-w [password]: default user password null
-b [base search]: search user, group
-d [dump all]: get all information
Example:
C:\>ldapminer.exe -h 127.0.0.1 -d
We will cover how to use Graphical tools in next section to this. Till next post just rememberJXplorer and Softerra LDAP Browser are graphical tools available to enumerate LADP.
LDAP Enumeration Tools And Counter Measures
LDAP Enumeration Tools And Counter Measures
When we covered LDAP enumeration we left tools part for discusing later. Now its time to have a look on every tool one by one. Lets start with LDAPminer, a free command line tool
.
.
LDAP Miner:
Download LDAP Miner from,
LDAP miner is free LADP enumeration tool. It is written in C and source code is also available for study and modification. It can collect information from different types of LDAP servers by identifying its type of server and then fetching specific information.
Syntax:
ldapminer.exe -h host/IP_address option
We have discussed options in LDAP Enumeration. Better use -d option
Example:
C:\Ldapminer>ldapminer.exe -h 127.0.0.1 -d
replace 127.0.0.1 with IP address you want to scan.
JXplorer:
JXplorer is a free general purpose LDAP browser used to read and search any LDAP directory. It needs Java virtual machine for installation and execution.
Some of the powerfull features of JXplorer includes,
-Supports standard LDAP operations {add,delete, modify}
-Can copy and delete tree structure
-SSL and SASL authentication
-Pluggable security providers
-Multiplatform support including Windows, Linux, Solaris, HPUX, BSD, AIX
-HTML type data display

JXplorer has many features that can not be easily included in scope of single post, I’ll better recommend you read their online manual for updated infomation on how to use JXplorer.
Softerra LDAP Browser/Administrator:
It is free LDAP client designed specially for windows. It is capable of detecting and accessing different types of LDAP directories and can support following Open Standards,
DSML
XML-RPC
XSLT

Since its functionalities are not limited as compared to JXplorer using it is not a kid’s job, better have a look on their online manul for more information on usage.
Prevention Against LDAP Enumeration:
Now that’s really tough job since preventing an Active Directory from LDAP enumeration is not quite piece of pie because its not really possible to prevent it from users accesing it from internal network. To solve this problem you will need a software named Citrix. Now as an intelligent question you might ask why Citrix? Because Citrix provides power of virtual computing and authentication that means none of the user will be allowed access to Active Directory unless he/she passes Citrix Session by disallowing anonymous LDAP queries. For more information visit www.citrix.com .
Understanding LDAP enumeration is little difficult from enumerating other things because there are lot of things that had to bought into condsideration and the attacker must have good knowlegde of at least Windows 2003 and Active directory configuration. If understanding LDAP enumeration is proving difficult for you don’t get disappointed, better read few tutorials about Windows 2003 configuration and Active Directory(can be easily found on by googling) you will surely get hands on it soon. Thanks for reading and keep visiting.
No comments:
Post a Comment